Wednesday, May 14, 2014

FINISHED: Megan Nielsen Tania Culottes

Every time I mention the word culottes my husband gets this look on his face and asks why I wouldn't just wear a skirt or shorts. I've composed a brief response to his inquiry:
  • Culottes provide the coverage and security that a short circle skirt cannot.
  • Culottes are more dressy than your average shorts. 
  • Culottes is a fun word to say.
  • I like culottes.
I personally think this argument makes perfect sense.

Last month I made a large purchase from Denver Fabrics, vowing that this would be my fabric purchase for the year and that I would sew through it quickly. I purchased a ton of cotton and have all of them earmarked for summer dresses. Since we live in coastal Georgia it made sense since "summer" is 8 months of the year. I also bought some linen but that's another story. 


I loved this black and cream geometric cotton - it's a true lightweight rather than a sheer. I realized, though, that I might not want it so close to my face for fear of making my friends sea-sick, so Tania culottes it became!
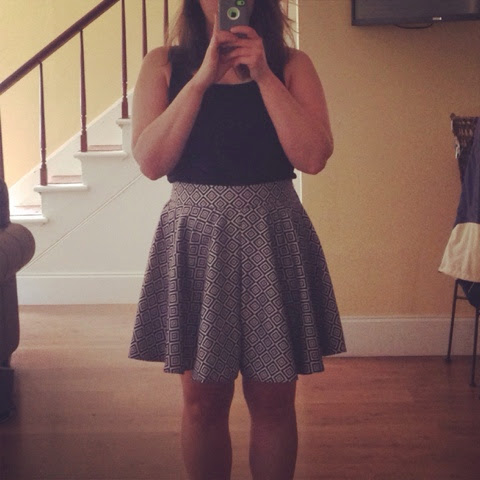

My last pair seemed a bit short for daily consumption so I added 1.5" of length following Megan's instructions on how to do so. For the record, you extend the seamlines - you DO NOT slash and lengthen. Easy. These are around 20" from my waist now which I like a lot. The fabric weight gives these a nice amount of body - they neither fall limp nor can they stand on their own. 

I zig-zagged the waistband facing and then stitched in the ditch without folding the ends under. The waistband on my last pair was a bit thick.

(Insert facing pic)
I let these hang overnight but didn't notice much bias growth. I went back and forth on whether to narrow hem or just serge and stitch and ended up narrow hemming. I'd love to learn how to use my narrow hem foot. :-/


I really like these, which is the real reason I'll continue making them, and that's just fine by me.

Pattern: Megan Nielsen Tania
Size: XL
Fabric: 60" geometric cotton lawn from Denver Fabrics, 2 yards
Needle: Shmetz 70/10 Sharp
Thread: Gutermann Mara 100 in black
Changes: Added 1.5" to length, interfaced both waistband pieces, regular zipper
Notions: lightweight fusible interfacing, thread, black zipper

Monday, May 12, 2014

REVIEW: The Complete Photo Guide to Clothing Construction

I have learned a tremendous lesson since learning to sew: I am 100% a visual learner. I really wish I had figured this out a few years ago - I could have taken advantage of Craftsy classes and various books and saved myself a lot of mistakes. Live and learn.

I follow Christine Haynes' blog and LOVE her Emery pattern, so when I learned she was writing a book I got so excited! I wasn't sure that I really needed this book, but I was wrong the minute I opened it up. 


First and foremost, if you are a visual learner like I am, you NEED this book. I cannot tell you how many times I have read through sewing books with minimal diagrams and walked away confused and frustrated. Enter The Complete Photo Guide to Clothing Construction!

To start, I want to list what makes this book so fantastic. Included in this book are:
  • 4 types of zippers: centered, invisible, lapped, and fly front
  • 6 types of hem finishes
  • 9 types of seam finishes
  • 2 types of pockets
  • 4 types of button attachment
  • 4 types of pleats
  • 2 types of collars - flat and rolled
  • 2 ways to finish with bias
  • 3 types of sleeves - set-in, flat and raglan
  • sleeve cuff and placket insertion
These techniques alone make this book worth buying, and it is full of photos to outline each step. I think my favorite section is How to Sew on Buttons. I can't remember seeing this in other sewing books, and it is so helpful to finally know the correct way to sew on a button.


The first part of the book covers basics for new sewists, but these later chapters on techniques are just brilliant. It is always nice, though, to see new techniques for things you do everyday, like sewing darts. Christine has a nice way of pinning each dart leg and then bringing them together - why haven't I thought of that before?!


I don't know why I've never tried a Hong Kong seam finish, but I'm planning to now. 


I appreciated having a formal explanation on the types of pleats. I had never really understood the difference between inverted and box until I read this and saw the photos.


There are so many techniques in this book that I have read about but never really understood until I saw all of the accompanying photos of actual hands manipulating the fabric. I am so glad that I went ahead and bought this book. The photos are wonderfully staged, and I love that she uses all independent patterns, including her own, for the garments. 

I think it is important to note that not everyone is talented at teaching, but to me, writing a sewing book is teaching at its finest. The language has to be such that complete beginners could teach themselves to sew from this book and I think Christine did a marvelous job. The language is clear and understandable, and the photos do wonders for helping us visual learners! 

Have you purchased The Complete Photo Guide to Clothing Construction? What did you think?

Thursday, May 8, 2014

FINISHED: Cotton Hemery (Hazel + Emery) Dress

The Hazel dress was the second Colette pattern I purchased - the first was Peony - and it was the first dress I made in earnest after we moved to GA in 2012. I made four versions of this dress in 2012:

1. purple chambray - size 14: too big, and very visible invisible zipper
2. aqua linen with muslim underlining - size 14 with 1" seam allowances: poor seam finishing led to fraying 
3. colorblocked cotton - strapless: too low cut, wouldn't stay up around bust
4. green swiss dot - size 10 + fba: poor fabric choice - way too sheer

I tinkered a great deal with the fit of the bodice, and tried several adjustments on the size 14 and the size 10. When the 14 seemed too large, I made a FBA on the size 10 and it ended up morphing into some kind of pseudo-princess seamed bodice.


After these four pseudo failures (I say pseudo because I had wearable garments, but not enjoyable garments), I wrote off the pattern altogether and said "to hell" with attempting to make the Hazel pattern work for me. What I once considered a tried-n-true pattern was marked off the sewing list.


But, two years and a few Pinterest pins later, I began yearning anew for the Hazel pattern. I'd also learned a few things about Colette patterns since then:
  • I wear a size 12 in the Laurel dress - interesting. 
  • Size 10 with fba in the Laurel dress was too snug.
  • Perhaps I should fba the size 12 Hazel bodice.
And this is where I found some success with the Hazel pattern. See, it's one thing to make a dress that is so-so and walk around all day knowing it's so-so, but it's quite another to wear something with confidence because you know it fits like a glove and has superior construction. So, I took size 12, made a 3/8" fba and made a muslin. I didn't like the length so I hacked it up and added some length so I'd show no cleavage. Presto!


The bodice fit perfectly! It's magical how these moments occur in our sewing lives. It's as if we have to make horrid sewing mistakes before the mysteries unlock themselves. I think this is a true testament to the need to keep fiddling with patterns until we have them just right. 


I swapped out the Hazel skirt for the Emery skirt, and the Hemery was born!


I found this fabric at JoAnn (gasp!) in the quilting section (double gasp!) and finally bought it when it became marked down, and I'm glad I did. If you pay attention, you know that Christine recommends quilting cottons for the Emery, and I personally believe the Hazel bodice needs some structure (see swiss cotton fail above). 


After I constructed the bodice, trimmed and notched the seams and pressed those suckers on my pressing ham, I stood there debating whether to serge or add a lining to the facing for some added strength. I had a perfect cotton voile in the perfect shade, so I finally decided it was worth it.


I then went rounds about whether to turn and stitch-in-the-ditch the lining, or just stitch to the skirt and serge them all, which is what I decided.


I serged the bottom edge and turned up 1 1/2" (1" less than recommended) and stitched the hem. I used a regular zipper in contrasting thread. For some reason it's been awhile since I've sewn zippers and I can't keep the construction order straight in my head. Sewing is a use-it-or-lose-it activity indeed. A bit wonky, but look at that waist seam matching!


I waited to install the straps until I had on a bra and my hubby so he could make sure they covered the straps. I interfaced both strap pieces (just to be sure) and used a 3/8" seam allowance rather than 5/8" to ease the turning. I used a triple stitch to stitch them down. The ends of the straps are serged.


Overall, I'm quite pleased with this dress. The fit of the bodice is near perfect - perfection is an odd thing to strive for given our imperfect bodies! The length is super-flattering - this skirt is just genius - flared a bit at the hem - love it! And the fabric, despite it's low brow origins (or something) I love as well.

I wore this on Wednesday to music rehearsals and really liked it. The bodice fits so well that I had no worries about it gaping open or anyone being able to look down it - a fear I had with the original length of the bodice. It was a tad snug to sing in and get a good breath, so I'll note that for future wearing. The straps perfectly cover my bra straps so I can wear this in the heat of summer without a cardigan.

Pattern: Colette Hazel bodice + Christine Haynes Emery Skirt
Size: Size 12 + 3/8" fba on bodice, size 12 skirt
Fabric: high quality quilting cotton, 2.5 yards of 45"
Needle: Organ 80/12
Thread: Gutermann Mara 100, seafoam for construction, black for hem and strap securing
Changes: 3/8" FBA, 1" length added to bodice, 1" seam allowances on bodice and facing, added bodice lining, serged seams, 3 rows of basting thread on skirt, serged and turned 1.5" hem, interfaced all 4 strap pieces, 3/8" seam allowance on straps, placement based on bra straps, regular 16" zipper with interfaced seam allowances. (Whew!)
Notions: needle, thread, roll tricot fusible for zipper, lightweight fusible for facings. 

Have you ever struggled with a pattern only to return to it later and solve your fitting issues? 

Wednesday, May 7, 2014

WIP: The Tailored Blazer

A month or so ago I signed up for Steffani Lincecum's class on Craftsy.com, Classic Tailoring: The Blazer. If you recall my sewlutions for 2014, one of them was to take more time on individual garments to really improve the construction quality. I ordered my tailoring supplies from Wawak, worked up a muslin of a McCall's blazer and cut into my most prized seafoam wool flannel that I'd been hoarding for a year.


It's important to be careful what you wish for - I wanted some projects that would stretch my skills, slow me down and force me to focus on quality construction. My jacket fronts (that's right - just the fronts), have taken me weeks to finish. The hair canvas is pad-stitched to the lapel, basted around the edges, then the roll line is taped, as is the front edge. Other pieces, which I haven't gotten to yet, are reinforced with muslin.


The class also has you do a bound buttonhole. I promise I did a sample, but something went wrong and I ended up having to do what I call a "faux" bound buttonhole - although Gail Yellen in 40 Techniques Every Sewer Should Know refers to what I did as the actual bound buttonhole method. I'm not convinced, but I fixed the issue of my wool being too dense to fold the lips.


What have I learned so far? A TON!
  • Hand stitching can be uniquely therapeutic and relaxing.
  • Hand stitching is neither complicated nor difficult.
  • Very fine pins hurt when they stick you.
  • Using a beloved fabric forces you to concentrate (shouldn't we always?!)
  • Always use a press cloth.
  • RTW is just terrible compared to these techniques.
  • I can only work for about an hour on this fine detail work before needing a break and a fast project.
  • I am 100% a visual learner.


I cannot wait to get this thing finished, and hopefully be able to wear it come fall!

Pattern: McCall's 6172
Fabric: seafoam wool flannel from Fabric Mart Fabrics
Needles: Thomas Sharps & Betweens
Thread: Gutermann Mara 100 from Wawak.com
Notions: hair canvas, 1/4" cotton twill tape, thread, basting thread, extra fine glasshead pins, tailors ham/seam roll/tailor's board, cotton muslin


Sunday, May 4, 2014

FINISHED: Colette Hawthorn

Have you ever had a project that you just weren't sure about until it was 100% complete? I had made muslins for the Hawthorn but somewhere along the journey (ie when hubby saw it 90% finished), I wondered if it was at all flattering. I tend to avoid strong waist definition since I don't have much of one but I think this might work.


Please excuse the iphone pic in the choir robe room - tis all I have!

Anyway, I bought 3 yds of this blueish cotton from Mood specifically for a Hawthorn, and I'm quite pleased with it. It sewed up easily and pressed nicely. I cut a straight 14, removed about 4" from the skirt length and made this version sleeveless. Could I achieve a better fit with a 12 + fba? Probably, but the 14 is nice and comfy without being overfitted.


I thought I had buttons in my stash but I didn't, so I found these nice grey ones at JoAnn. I'm really liking the slightly brighter thread on the buttonholes and topstitching - nice pop of color. 


I used a slightly lighter Gutermann Mara 100 for the hem, about 3.5 stitch length. 

Overall, I think I could maybe wear belts with this under a cardigan - the cardigan adds a bit of waist definition. I put in the hook & eye but I'm not pleased with it and might trade it for a snap. I used stat tape at the waist seam around the entire bodice and serged the waist seam. All others are French seamed.


The side view is nice - just above the knee and nice and swishy. But, the fabric wrinkles...


In her Pants Construction class on Craftsy, Sandra Betzina called wrinkles in linen "rich wrinkles" - polyester doesn't wrinkle. I'm going to go with that here too!

Pattern: Colette Hawthorn size 14
Thread: Gutermann Mara 100 
Needle: Organ 70/10
Buttons: JoAnn 6 for $.99
Changes: shortened bodice 1", shortened skirt 4"
Make Again? I think so - with a snap! 

Me Made May 2014 - I'M TOTALLY IN!


I am so thrilled to finally be participating in Me Made May! I remember anxiously wanting to a few years ago but just not having enough handmade items in my closet to do so!

So, without further adieu:


I, Burke of A Modern Seamstress sign up as a participants of Me-Made-May '14. I endeavor to wear at least 1 handmade item each day for the duration of May.

If you are so inclined, I'll be posting daily photos via Instagram (to keep me honest) and you can follow me here: http://instagram.com/burkebgood.

Woohoo! I am so excited about this! I wear probably 90% handmade anyway, but this will be fun!

Friday, January 31, 2014

A Sewist's Nightmare

Last week I was chugging along on some Colette Iris shorts in silk matka - a beautiful but medium weight silk that I'm pretty sure dulled my rotary cutter - when I hear the most awful sound from my machine. It then seizes and stops working. I bought the Brother CS-6000i two years ago when I was first starting out and I really love it. It was $150 - which comes to $.03 per sewing session given how much I sew. I took it to a repair guy in Florida and for $130 he can repair what he thinks is wrong - but that's no guarantee that it will fix it. 

After doing a LOT of research, I bought another CS-6000i from Amazon from $140 and I've decided I'm going to save this year for a Janome MC6300. I think it's about time I upgraded to a better machine anyway. This little purchase of $1200 should take me most of 2014 to save for, but I feel good knowing my new machine is on its way. All it has to do is last for one year. 

What I didn't anticipate, though, was how empty and out of sorts I would feel not being able to sew. I have a friend who lent me her 20-year old Janome Jem Gold but I was machine-less for about 5 days. I didn't realize how much sewing had become by stress relieving activity. I felt stressed out just knowing I couldn't come home and sew. I spent that time cutting out future projects and putting them in giant zip-loc bags.

This also gave me time to think resourcefully - I narrowed down my patterns to 15:
1. Colette Laurel
2. Christine Haynes Emery
3. Colette Hawthorn
4. New Look 0165
5. McCall's 5927
6. Deer & Doe Sureau
7. Colette Iris
8. Colette Violet
9. Burda 7123
10. Deer & Doe Chardon
11. Colette Zinnia
12. Megan Nielsen Tania
13. Papercut Patterns Saiph 
14. Burda 7739
15. Deer & Doe Plantain

(I would link all of these but I'm pretty sure most people in the sewing world know how to find these.) I also sold 11 independent patterns for $20/each so that helped jump-start my new machine fund. 

In other news, the weather was in the 30s this week in Coastal Georgia. The schools were out on Wednesday in anticipation for icy rain. Back in TN, where we're from, they've been out all week due to snow - something I would have liked to have experienced in my 28 years there. Oh well. 

I've also been working on my Wardrobe Architect assignments from the Colette Patterns blog. This has been such an interesting experience and I would highly recommend it to any seamstress. Ironically I did a ton of sewing "planning" in December and then when I sat down to sew my machine broke. I've concluded a few things about my personal style goals:
1. Now that I'm working several PT jobs rather than one FT job, I have no imposed dress code and can therefore dress however I please - which is both good and bad - I now have unlimited options which adds to my procrastination on what to sew next. 
2. I really admire older women's style - they usually can afford quality items, have figured out what works for them, and don't seem to care too much about what other people think of them. I admire all of these things and hope to incorporate this more.
3. I should stick to patterns that are tried-and-true, stop buying new patterns out of "blogging envy" of seeing every other seamstress making them, and I should make multiples of things I love. I easily got rid of 11 patterns this week and have a few more lying around that I bought and have never used. 
4. I need to buy blue, purple, green and fuschia fabric only. Yellow, orange and red are just not my colors, so I need to stop. Fantastical prints on cheap fabric also have to go. Enough is enough. 

I've decided that my dresses and other garments can be solids and essentially "basics" and my shoes can be the interesting colorful touch. (Can you tell I bought new shoes this month? Yay!)

Back to my machine dilemma...
What machine do you use? Which would you recommend?